One of a series of new bags for the big Christmas gift show next week end. I used a combination of decorator fabrics, silks, woolens and lots of scraps and pieces! It was fun pulling the fabrics and creating combinations that I liked. I will post all of the bags when I get them finished (hopefully this week end. 10 more bags in process of being completed.
Saturday, November 6, 2010
Thursday, November 4, 2010
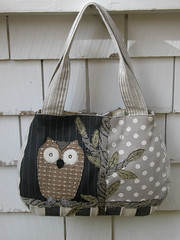
Scrappy owl bag
I've been working on a pattern for a bag that is the size and shape that I like. I didn't want to spend the time just making the bag out of muslin with nothing to show at the end.
I started with pieces of home dec fabrics that were sample cuts from a local wholesale supplier. I've been obcessed with birds lately and decided to come up with an owl design that would work on the bag. I couldn't spend much time on it so it had to be simple but fun. I just did some free cutting of my fabrics and made a simple owl pattern and quickly rough edged the applique to the bag front.
After spending the afternoon sewing, un-picking, sewing, un -picking over and over again. I came close to what I wanted. It still needs some tweeking but I'm getting close.
Let me know what you think. I'll be having a fun giveaway on Nov. l5th so stay tuned. I'm going to start posting on my blog at least everyother day starting the 15th. There will be giveaways, tutorials and lots of new projects in the months ahead.
Sunday, October 3, 2010
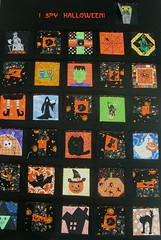
halloween calendar in progress
I had a wonderful collection of 3 1/2 inch square from the Bitty block committee swap this month! Everyone made such creative and imaginative blocks that I simply had to share with my grandchildren! I wanted to create something for halloween similar to the advent calendars you see at Christmas. I had to make a few extra blocks to fill in because I wanted to save some of my blocks to do the same thing for THanksgiving. Each block is faced and has a slightly longer piece of fabric behind it so that it forms a pocket. I added an embroidered panel on the top that reads "I Spy Halloween" because the youngest who is four loves I Spy books! I will fill the pockets with odd treats and a few tricks for the days heading up to halloween. My thanks to all of the creative friends who contributed to this little quilt and the one that I will be making for Thanksgiving!
Friday, September 17, 2010
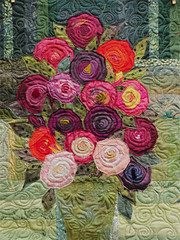
little bouquet quilt along quilted
I've been looking back at the quilts and projects that I've done in the past year. This has to be one of my favorites. It was a quilt along and you can find the button on the side of this blog. It is still up and well worth the time to follow the instruction and make one of these beauties. I added the flower pot to mine made out of a hand dyed vintage linen that had a hand crocheted edging on it. I quilted it heavily used cottons for the pieced background and all silks for the bouquet of flowers! The leaves are also hand dyed fabrics that I purchased at Houston Quilt Festival one year! Enjoy!
scrappy pincushion sneak peak
Ah....here is the twist! I've added a pincushion in the shape of a fish with beaded detailing and a fin that serves as a needle case! So is this for the scrappy pincushion swap or for the mug rug swap?

scrappy mug swap
One of my recent swaps is making a "mug rug"! But this one has taken a twist! Stay tune to see what did when I was too tired to pay attention to a few minor details! I wanted my partner to get away from it all when it's time to take a break! So....This is a little carribiean retreat complete with a porthole on the cruise ship to the Matisse style bright colored buildings under the palm trees!

Wednesday, August 11, 2010
birds, birds everywhere
Just three weeks to go until the big show in Middway Utah! Here are just a few of my birds that are stitched and waiting to be framed. My husband has been painting frames for days! I won't have much time to blog until the show is over but after that I plan on posting some fun tutorials and lots of new things! And a BIG giveaway in September so stay tuned!
Thursday, August 5, 2010
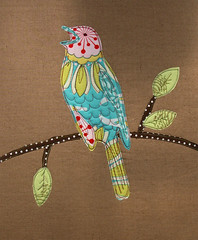
possible DQS9
I am working for the next three weeks on projects that I will be selling at the annual Swiss Days Festival in Midway, Utah. The art event had an attendance of over 100,000 people last year over two days. It will be labor day week end. My daughter and I are sharing a booth. We were so excited to be juried into the show. We have been attending for years and have wished that we could be a part of it. My daughter is a professional photographer and will be selling her "Little Lightbox Designs". She does incredible "word" art and her photographs are amazing!
This bird is one of the pieces that I will be selling at the show. I am also considering do this design in a mini quilt for my DQS9 partner. I have finished another quilt with a bird theme as well that I originally made for the swap but now I am waffling about what my partner might like the best. If I decide to use this one for the show it will be framed in a white frame and sold as an art piece.
I will post more images of the types of things I will be selling in the coming days leading up to the show. If you are in Utah for the Labor Day week end, don't miss this show! Everything is original and must be the work of the artists with 180 booths and lots of entertainment and great Swiss food and bakery goodies!
Hope to see you there!
Monday, July 5, 2010
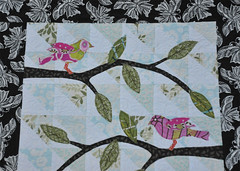
DQS9 quilted
I am in the final stages of the quilt I am making for the DQS9 swap. I am still playing with alot of birds and these are perched on limbs with raw edge applique leaves and lots of free motion stitching on the birds and the leaves! The background is HST's in white and soft muted aqua prints. I wanted the background to be pieced, but very subdued so that the bierds could pop along with the brances and leaves....The border is a favorite butterfly print in chocolate brown and white that seemed to be perfect with the rest of the quilt.... I hope it is something that my partner will like...
Charm mini swap sent
This is the mini that I made for the Charm mini swap. My partner sent me a charm pack to work with and 1/2 yard of fabric and this is the result. Charm packs are perfect for stacking and I couldn't resist doing some of my birds on a wire! The finished size was about 18X26. It is backed with a fun Moda vintage red print. It turned out so fun that I think I will make a few for the art show I am doing on labor Day! If anyone is going to be in Utah for Labor Day, let me know you won't want to miss this art show! They usually get 70,000 to 80,000 people attending every year for this two day event!
Thursday, June 10, 2010
Scrappy flying geese tutorial

Scrappy Flying Geese Tutorial. Here is the tutorial I promised for the scrappy flying geese blocks. They are so much fun to make and add interest and a scrappy look to a traditional favorite!
You will need:
solid fabric for the base of your blocks ( I suggest a lighter color)
contrasting strips ( I will give you the cutting instructions as we go along....)

Begin by cutting your solid base pieces. for my sample I am cutting 2 1/2 inch high by 4 1/2 inch wide base blocks. This will be the size you will use in making a finished 12 inch block.

Now cut your strips. for this block cut strips 3/4 inch wide. cut an assortment of strips to make your blocks as scrappy as possible. Cut a few strips that are 1 1/4 inch wide. You will use these to finish your corners and eliminate bulky seams close to the corners of the block. These strips can be short. You can even use small scraps to fill this last section.

Prepare your base block. I have drawn a line down the center to make it easier to see, but you will just be pressing this line in place with your iron for reference when you are making your other lines. Mark a line 1/4 inch from the long edge on one side of the rectangle. Now mark 45 degree lines from the corner, intersecting the 1/4 inch line in the center. Mark this 45 degree line from both corners as shown. I have used a black pen so you can see it, but you will want to use just a light pencil or disappearing marker.

I put my block on top of a light box so you can see what I am doing. My block has the side with the lines drawn on it up and facing me. the strip is on the opposite side of the block. this is where the paper piecing technique comes into play. Pretend that the fabric block is your paper. I have lined up my fabric strip 1/4 inch from my drawn line. It was really quite easy to line up just by holding my block up to the light and holding the strip into place. It is also easy to see from the top side shere the strip's 1/4 seamline will line up with my line at the ends and corners of the block. The right side of my fabric strip is facing the underside of my block (right sides together). I will be stitching from the wrong side (side with lines marked on it) of the block. You will stitch along your marked line. turn the block over and press the strip toward the corner.

We are looking at the block on a lightbox again so you can see the fabric strips on the underside of my block. You can see that the first strip has been stitched and pressed up. Now you will do the alternating row on the other side of the block in the same way. You can see where it has been stitched along the other 45 degree line. When you have it stitched you will turn it over, press the seam towards the corner.

OK....the paper piecing part is complete. Now you will begin doing your fun strip piecing! Simply lay your strips right sides together as shown in this photo. Stitch a 1/4 inch seam. Press towards the corner and continue in the same way with the alternating row on the other side! Just like a strip pieced block!

Your blocks will look like this after your first two rows! For this size block you will do 3 rows with the 3/4 inch strips and use the wider strips for your final fourth row (to fill the corners).

Now you have a wonderful stake of fun scrappy blocks! Now we will prepare them for the final block design!

Turn your block over to the wrong side and trim all excess strip pieces away with your rotary cutter and ruler. Be sure to straighten up your side and long edges. Trim your block to a nice finished 2 1/2 inch by 4 1/2 inch block.

The block on the right is the way your finished block should look. The block on the left is WRONG. The block on the right as you can see has the strips overlapping, giving you a 1/4 "V" from the edge. This will give you a perfect flying geese block when your seams are sewn. If your block looks like the one on the left, you will not have a nice "V" when it is finished.

Now you will use your blocks in the selected design. This is how I laid out my finished 12 inch block! This block was made for the Quilt Dreams quilting Bee for Julie. I can't wait to make a full quilt with these scrappy Flying Geese!
flying geese strip pieces
I will be posting my strip pieced flying geese blocks in a tutorial. I borrowed a combination fo techniques from paper piecing and from strip piecing to make my blocks. I was happy with the scrappy look of these flying geese blocks. I think it makes a fun variation of an old favorite!

Tuesday, June 1, 2010
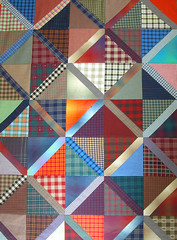
scrap quilt
I had a stack of sample squares from Mission Valley Textiles in Texas floating around my sewing room for years! Their fabrics were all fabulous yarn dyed cottons so the colors are as vibrant on the wrong side as they are the right side! In fact you really can't see a wrong or right side on this yarn dyed beauties! I had been waiting for just the right pattern to make a scrappy quilt that could use the wide assortment of plaids, checks and colors. milliemorgan on flickr posted a quilt she had made using this pattern. I loved it! You could tell that it was really a stash buster and the more varied the prints and colors the better! The pattern was originally printed in McCall's quilting magazine in August of 2007. I was able to find a copy on ebay!. This is the result! What a fast and easy pattern to do! I mixed it up a little from the original by shuffling my triangles after I cut my blocks in half! Can you see the pattern? the original pattern had you cut your block in half and sew a 1 1/2 inch strip in the middle, rejoining the two cut triangles to the center strip. But I mixed up my cut blocks and then started sewing the strips into the blocks! I really like the result! An even scrappier quilt don't you think? Then you lay your blocks out so that the strips form the on point squares! I made the entire quilt top in one day! Fast, easy and I think it would be fun in so many different types of fabrics. What a fun way to use a charm pack or two! I plan on making it up in something completely different just so I can compare the results! Let me know if you try this one! Wouldn't it make a fun baby quilt?
Saturday, May 15, 2010
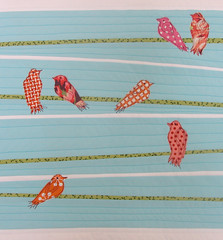
pillow top complete
Well, here are my little birds on a wire! All stitched with free motion and quilted onto the background. I really like the result and plan to do a series of projects using this theme and design. Products with this design can be found after May 18 in my etsy shop nanotchka.
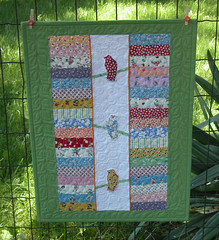
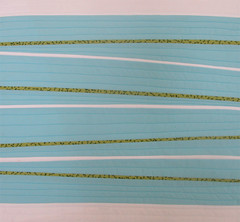
pillow swap sneak peak
This is the canvas for a pillow cover. I'm working with colors and a theme that I think my partner will like. The backgound has been sliced and narrow pieces of white and green were seamed into the solid cotton. After my background was pieced I quilted.
Tuesday, April 27, 2010
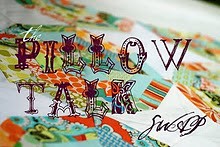
pillow swap talk - ROUND 3 Sign ups!
Just signed up for another round of the Pillow Talk swap! It's one of my favorite swaps and the designs are always an inspiration and so much fun to watch as they progress! Don't miss out ! Sign ups going on now!
Saturday, April 10, 2010
travel bag for ME!
I leave on Monday to visit my daughter In Pittsburgh. I thought a new travel bag was in order and found a great piece of vintage drapery fabric with an interesting tree design on it. I could resist filling the trees with little raw appliqued birds. The bag has a top zipper closure and is fully lined with lots of pockets for the trip. The large rough mother of pearl buttons pick up the colors of the bag and the birds. Now I'm ready to go!
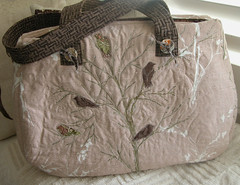
Vintage bird embellished bag
I used vintage home dec fabric for the base and filled the tree print with a few birds from modern prints. The bag is heavily quilted and lined with lots of pockets for traveling.

not from me
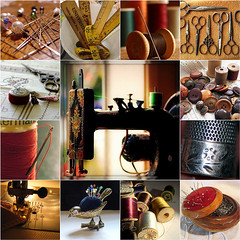
I found this on flickr this morning. I love anything old related to sewing! It really lets all of us know that we love and are doing something that has fascinated women since the invention of the sewing machine and probably before that! This is such a wonderful collection! Check it out!
Thursday, April 8, 2010
A bag for Erin
I will be leaving on Monday to visit my daughter in Pittsburgh! Couldn't resist making her something special to surprise her with! This was my second try, I wasn't happy with the first bag and cut it to pieces! But I think she will like this one. The bird fabric is one of my favorite Joel Dewberry prints teamed with some Amy Butler! It is a big bag lined with pink and white polka dots and some Kaffe Fasset floral that looked great with the outside prints! Lots and lots of pockets inside. I think it will make a great travel bag for the summer. You can see it is much bigger than all of my 18 inch pillows! The zipper closure has a fun crystal piece that I was lucky to get in a swap recently. Hope she likes it! Can't wait to give it to her in person! It's been over a year since I've seen her! (and my 4 darling grandsons!) Hope they still know their Nana!

Tuesday, April 6, 2010
decorated eggs
couldn't resist sharing what I found on bailiwickdesigns flikr photostream today! I love the creative use of so many bits and pieces of lace, trim, paper and more! She has used so much detail and each egg seems to have a character of it's own. Check it out! A great inspiration to carry over to other projects from cardmaking to quilts!

Sunday, March 14, 2010
pinwheel flower for Ruth
This is the second block for Ruth's garden quilt in the Blocks of a Feather Quilting Bee. I can't decide if the flower should have a center of dark brown or just to leave it as it is....
block for Ruth
It's Ruth's month in the Blocks of a Feather Quilting Bee. Her theme is "the garden". The fabrics she chose are soft and remind you of spring. This is the first block that I made for her quilt. I know when I see the hummingbirds in my garden that spring is on it's way. I found snowdrops blooming in my garden on Friday and felt the anticipation of spring. Unfortunately it snowed 6 inches on top of my snowdrops on Saturday afternoon crushing my dreams of an early spring!

Sunday, February 21, 2010
DQS8 ready to post
I have finally finished my DQS8 quilt for my partner. It will be in the mail soon and on it's way. I hate to see this quilt leave, I plan on making one for myself in March. On my way to teach at the Sewing and Stiching Expo in Washington State. Hope to see some of you there! Please join me in my class, I will be teaching a 45 minute seminar each day of the show! It's one of the largest shows in the country so don't miss it if you are in the area!
I hope my partner likes this little quilt. The small lace flowers are embellished with small pearls. I hope it will brighten up someone's world!
I hope my partner likes this little quilt. The small lace flowers are embellished with small pearls. I hope it will brighten up someone's world!
Tuesday, February 9, 2010
don't miss this giveaway!
Great giveaway on http://www.lovelylittlehandmades.blogspot.com/ She is celebrating her 100th post! You won't want to miss this one!
Wednesday, February 3, 2010

Wednesday, January 27, 2010
advent swap 2009
I am very very late in posting a picture of all of the fabulous "pressies" that I received in the 2009 Advent Swap from Kaylee in Australia! Can you believe all of the wonderful things that she sent to me! There were so many handmade gifts, like the tiny hand-beaded handbag pin and the hand-stitched basket of cheeries that is pictured here but sits in a frame on my worktable. The Handmade ornaments are amazing and I haven't figured out how she made them yet. My favorite thing in the world is fabric and she sent such special pieces that have Australian prints and some beautiful Japanese fabrics too. The Australian cards are too pretty to send. Lots of trims and special handmade items as you can see! My final gift was the candy cane doll! She looked so precious hanging next to my entryway table filled with candy canes between Christmas Day and New Years Day! My friends and family were very impressed! What a fun swap and we had so much fun chatting back and forth across the world. I plan to keep in touch! Thanks again Kaylee for being such an amazing swap partner and making it so much fun!

Sunday, January 3, 2010
quilting 2009

Celebrating a wonderful year of quilting and exploration with a mosaic of my quilts and a mosaic of some of my favorites from other quilters that I have followed on Flickr...
My quilts

Some of my favorites! Inspiration for 2010!
Subscribe to:
Posts (Atom)