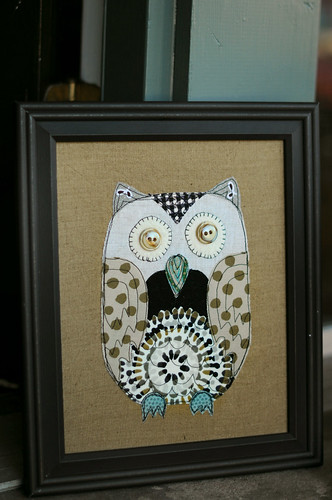
Ive been making some new owl pictures for my etsy store this week. I like to put them on a nice linen background and use some of my favorite quilting prints for their bodies. My stock of vintage buttons work great for the eyes. I give them detail with a little free motion thread painting. all of the frames that I use are vintage and re-purposed. Now back to my quilts!
Monday, August 22, 2011
Saturday, August 20, 2011
ready to quilt
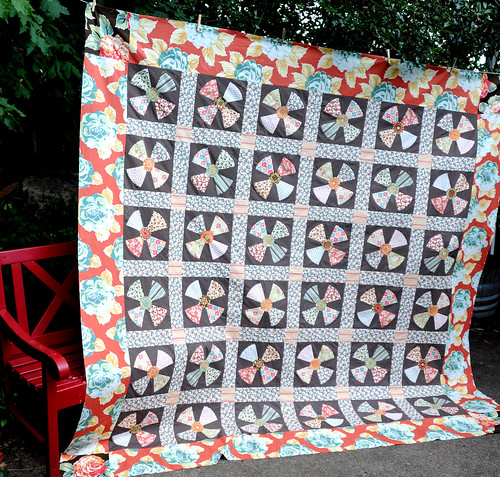
My daughter had her choice of my fabric stash and chose the stack of Blossom by Urban Chics for Moda for a quilt! After pouring though some of my favorite quilt books she picked this Whirly gig design from Kaffe Fassetts Country Garden Quilts. I made it larger than the pattern and the finished quilt will be about 96 X 96! I hope she likes it! It's ready to quilt and then will be on it's way to Memphis!
Monday, August 15, 2011


Wednesday, August 10, 2011
value quilt quilt-along
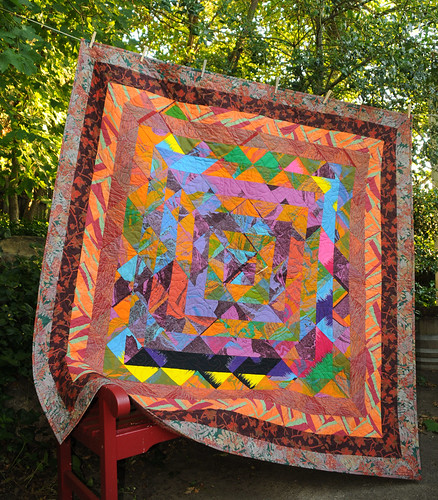
This is Quilt #6 of my 23 unfinished quilt tops! I made this quilt last year for the value quilt along. I challenged myself to use fabrics from my stash on this one! This fabric is all Marimeko prints from Finland that I purchased in the early 80's or late 70's! It was interesting working with such vibrant and bold patterns to co the quilt along.
Tuesday, August 2, 2011
quilting on my longarm


Saturday, May 21, 2011
orphan charm square quilt
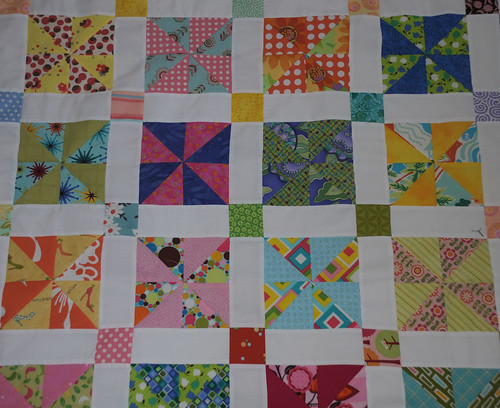
I wanted to try a new way of making pinwheels that I found on www.missouriquilts.com I decided to rescue a pile of orphan charm squares that were sad leftovers or rejects from other projects. I love the scrappy result.
Tuesday, April 5, 2011
trendy apron
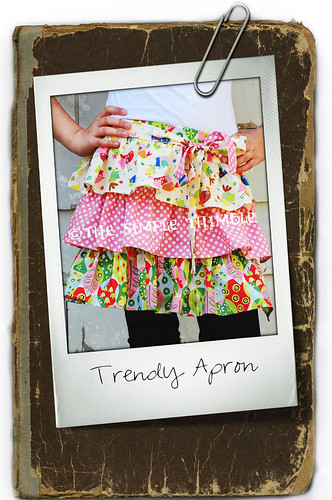
I am working on my samples for summer classes at The Simple Thimble. This will be a "Lets get sewing" class for beginners. I think this flirty apron will be a fun first project to learn some simple sewing technigues. It uses just 3 fat quarters and can be made in a morning or afternoon class. I am looking forward to the summer Thimbleina classes especially where I will be working with children from 8-12 who are just learning to sew! I can't wait to get started!
Tuesday, February 8, 2011
Vintage sheet Asterisk Chenille Quilt

Vintage Sheet Asterisk Chenille Quilt Tutorial and Giveaway!
Generator
Min:
Max:
Result:
13
AND THE WINNER IS NUMBER 13! Jennadesigns is the winner! Please contact me and let me know what colors of chenille you would like to have and I will get them right out to you along with my new book Re-Inventing Chenille. Thanks to everyone for the wonderful comments. I hope some of you try this run way of making an Asterix Quilt!
A tutorial and a Giveaway! Learn how to make this fun Chenille Asterisk Quilt and have a chance to win 3 rolls of 3/8 inch wide Chenille-It Blooming Bias as well as a Book!I spent last week end making this "Asterisk" inspired quilt using fat quarters of vintage sheets that I received in a recent flickr swap! It was fast and easy to make and was truly a "week-end" project that I completed in just over two days! I made a "real" asterisk quilt for one of the Old Red Barn quilt alongs on flickr last fall and loved the look and style but wasn't quite as happy about all of the time it took to do all of the inset pieces in each block to create the design. I decided it might be easier to use the 3/8 inch wide Chenille-It Blooming Bias to make the design lines and after it was washed I would have the same design lines become the texture and feel of old fashioned chenille. I've had several requests for a tutorial so here it is!

I decided that the look and feel of vintage sheets would be perfect for this project but you can you any quilt fabrics of your choice! This is a perfect charm pack project or a stash buster quilt! I worked with 5 1/2 inch squares because that made the most use of my fat quarters but charm pack 5 inch squares will work just as well. I cut 12 fat quarters into blocks and my finished quilt is 55X60 inches. I also pressed each block in half in both directions before I started stitching my chenille. You will have a perfect center mark to follow as well as a line for the vertical and horizontal stitching. I chose six different colors of 3/8 inch wide Chenille-It Blooming Bias (available here http://www.fauxchenille.com/ on the fabric by the yard page) to coordinate with my blocks.
I 

Begin stitching the corner to corner lines on each block first. Be careful not to stretch the bias chenille tape as you sew. It can also be helpful to use a walking foot if you have one but it is definitely not necessary. The quilt I made was with a regular foot. Set your stitch length to 2.0 to 1.5. The shortened stitch length will be sure to secure the chenille securely. I stitched all of the blocks of one color at the same time chain stitching as I did each row of the chenille. This makes your stitching fast and easy and I had virtually no waste on my chenille tape!


See how easy that was? I did these blocks in an afternoon! I recommend that you press each one flat from the wrong side before piecing them together just in case your machine has caused any puckering of the fabric when you stitched down the bias strips.


I started quilting on one end of my quilt on the first horizontal line of chenille bias. You will simply stitch right on top of your stitching on each row of bias! Try and stay right on the same row of stitching so that you won't affect the chenille when it blooms! Stitch all of the horizontal rows unrolling your quilt as you go and then reroll the other direction and do the opposite rows. And finally...roll your quilt corners to the center and starting with the center diagonal row, stitch all of the diagonal rolls again on top of the original stitching! This made it so fast as easy to quilt and all of my rows were perfect and straight without any marking!

Now the fun part! Throw your quilt in your washer. You will get the best result with a top loading washer! Front loading machines don't agitate so if you have a front loader you may want to go to a laundramat. Another note! This is NOT A RAG QUILT! You will NOT get any mess when you wash this quilt. All of the tape is on the true bias so when you stitch your rows you are catching all of the threads! All it's going to do is fluff up....not leave any mess in your machine unless it's a little (very little) bit of lint when you dry it!
Rag quilts make a huge mess in your washer and dryer because they are cut on the straight of grain! Plus you also clip all of those seams so when you wash it all of the threads come out into your machine. There are many laundramats that won't even let you wash that type of quilt in their machines! I promise you this quilt will not do that!

I think it's time for a giveaway! Your choice of three 3/8 inch wide rolls of Chenille-It Blooming bias! You pick the colors and I'll hrow in a copy of my book Re-Inventing Chenille. Just leave a comment for one chance. Follow my blog for a second chance and Blog about this tutorial for a third chance to win! I will leave the giveaway open until Valentines Day!
Thursday, January 13, 2011
Puppy Love
I can't resist sharing one of my daughters photographs! This is my youngest grandson! You can just imagine the photographs that I have of my grandchildren! She will have a website up soon.

Sunday, January 2, 2011
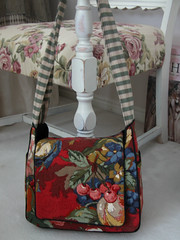
SLR camera bag finished
I have been wanting a camera bag that I could use when I'm on a shoot without carrying all of my equipment and lenses as well as something that didn't scream "camera bag"! I used a piece of vintage home dec fabric that I've had for awhile and was waiting for just the right project. The bag is piped on all of the seams with black and has side pockets on the outside side panels for a quick place to keep my lense covers when I'm shooting. It is heavily padded with high density foam. I'm quite pleased with the result. I can't wait to try it out on my next shoot.
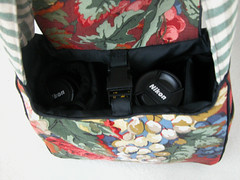
slr camera bag.... a look inside
This is the inside view of my camera bag that I put together over the holidays. The inside is nylon with a double layer of high density foam on the bottom and high density foan on all sides with velcro adjustable interior panels. There is room to hold my slr and an extra lense when I'm on a shoot plus extra room for additional lens filters or a notebook.
Subscribe to:
Comments (Atom)